How to Create a ZIP File on Mac: A Comprehensive Guide
Creating a ZIP file on a Mac is simpler than many might think. By utilizing the built-in macOS features, you can compress files and folders quickly to save space and enhance file sharing. In this guide, we’ll walk through the essential steps to effortlessly create a ZIP file on your Mac, along with some helpful tips for file management.
Understanding ZIP Files and Their Benefits
Before diving into the instructions for creating ZIP files on a Mac, it’s important to understand what ZIP files are and why they’re beneficial. A ZIP file is an archive file format that allows for lossless data compression. This **uncompressed data** is organized into what’s known as a container, simplifying file storage and reducing file size significantly. One of the most essential advantages of using ZIP files is that they are perfect for compressing files on Mac, making them easier to share, especially when emailing.
The Advantages of Using ZIP Files
ZIP files come with several benefits, such as drastically reducing the file size, which helps in managing disk space on your Mac. When you create a ZIP file, it also groups multiple files or folders into a single file for easy sharing. This simplifies the process of organizing files, be it personal documents or large projects. Moreover, ZIP files maintain their folder structure, ensuring that you don’t lose the organization of your digital workspace. For instance, when you archive an entire project folder as a ZIP file, it remains neatly arranged upon extraction.
Compatibility and Efficiency
One of the critical aspects of ZIP files lies in their compatibility. All major operating systems, including macOS, Windows, and Linux, support the ZIP format, allowing seamless file sharing across different platforms. Additionally, the speed of zipping files on Mac is quite efficient, enabling rapid compression without consuming extensive system resources. Learning how to create a ZIP file effectively leads to enhanced productivity, particularly for users with many files needing organization or regular backing-up.
Basic ZIP File Creation Process
Creating a ZIP file is a straightforward procedure on a Mac. First, you can utilize the built-in macOS Archive Utility, which handles file compression effortlessly. By selecting the files or folders you wish to compress and right-clicking, you can choose “Compress” from the context menu. This action will create a ZIP file, usually with the same name as the folder or the first file you highlighted to compress. The new ZIP file will appear in the same directory, ready for sharing or backup.
Detailed Steps to Create a ZIP File on Mac
Having established the significance of ZIP files, let’s delve into the specific steps for creating one:
Selecting Files for Compression
Start by organizing the files or folders you wish to combine into a ZIP file. Open a Finder window and navigate to the items you want to compress. Whether it’s documents, images, or a complete folder, selecting multiple items is straightforward. For better organization, ensure all your files are in a designated folder if you are working with numerous files. Once you’re ready, hold down the Command (⌘) key and click to select each file, or drag your cursor to highlight them all at once.
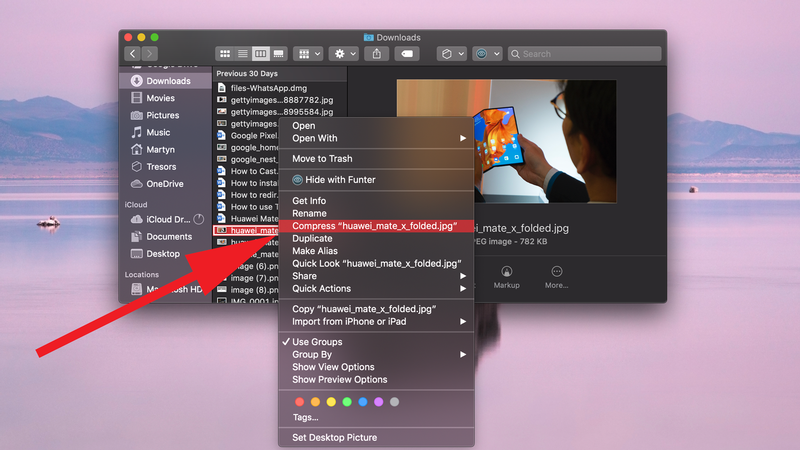
Using the Right-Click Menu
With your files selected, the next step is to right-click (or control-click) on the highlighted items. From the context menu that appears, choose the option labeled “Compress [number] Items” if you are compressing more than one file. If only a single file is selected, it will simply say “Compress [file name].” This will trigger the macOS zip function, and your files will be zipped into a single ZIP file. It’s as easy as that!
Locating and Verifying Your ZIP File
Once the compression is complete, your new ZIP file will be generated in the same directory as the original files. It will carry the name of the original folder or the first selected file, with a .zip extension. You can verify the file size reduction by right-clicking on the new ZIP file and choosing “Get Info.” Here, you can see the size of the compressed file compared to the total size of the original files. This simple step is essential for checking that your file compression on Mac was successful.
Advanced Techniques: Using Command Line for ZIP Files
For tech-savvy users, macOS provides another way to create ZIP files through the Terminal. This method might seem daunting at first, but it’s quite efficient for those familiar with command-line interfaces. Using the Terminal can help streamline the zipping process, especially when batch zipping multiple folders or when scripting is involved.
Executing ZIP Commands in Terminal
To utilize the command line to create a ZIP file, open the Terminal application from Spotlight or Applications > Utilities. The basic command you’ll use is `zip -r [filename].zip [directory]`. For example, if you wanted to compress a folder named ‘Documents’, your command would look like `zip -r Documents.zip Documents/`. This command creates a ZIP file called ‘Documents.zip’ in your current directory and compresses the entire folder accordingly. It’s an efficient way to manage multiple files that need compression quickly, enhancing the functionality of macOS file options.
Using Automator for ZIP File Creation
If you frequently create ZIP files on your Mac, you may consider automating the process using Automator. This application allows you to create workflows that streamline repetitive tasks, including file compression. Open Automator and create a new workflow. By designing a simple drag-and-drop interface, you can save time while managing file compression without repetitive commands every time you work. This function can considerably improve your file management on Mac and reduce manual tasks.
Best Practices for Managing ZIP Files
Now that you understand how to create a ZIP file, it’s crucial to consider best practices for managing these compressed files effectively. Always ensure to maintain organized naming conventions for your ZIP files, indicating the contents or version dates to avoid confusion. Additionally, regularly clean up older ZIP files that are no longer needed to save disk space on your Mac. Lastly, merging the use of cloud storage can enhance your workflow, as uploaded zip files make sharing across platforms easier and more reliable.
Key Takeaways
- Creating a ZIP file on Mac is simple, using Finder or Terminal for compression.
- ZIP files save space and make file sharing significantly easier.
- Advanced techniques, including Terminal commands and Automator, can streamline your process.
- Establishing a solid file management strategy is crucial for maintaining order.
FAQ
1. What is the best way to compress large files on Mac?
The simplest method to compress large files on Mac is by right-clicking the file or folder and selecting “Compress.” This shrinks the size significantly while keeping the contents intact, making it perfect for email or cloud storing. If files are exceptionally large, consider using the Terminal for more extensive batch operations.
2. Can I extract ZIP files on macOS?
Absolutely! Extracting ZIP files on macOS is straightforward. Simply double-click the ZIP file, and it will automatically unarchive to reveal its contents in the same location. If you prefer the command line, you can use the `unzip [filename].zip` command in Terminal.
3. Do ZIP files lose quality when compressed?
No, ZIP files are designed to provide lossless compression, meaning that the original quality of your files remains intact. When you decompress a ZIP file, it restores the files back to their original state without any loss of quality.
4. How can I password-protect a ZIP file on Mac?
To password-protect a ZIP file, use the Terminal and the command `zip -e [filename.zip] [file]`. This prompts you to enter a password after which your ZIP file will be secured. Always remember your password, as it cannot be recovered if forgotten.
5. Are there any third-party applications for creating ZIP files on Mac?
Yes, there are several third-party ZIP utilities for Mac, such as The Unarchiver and WinZip, which offer enhanced features like batch compression and file encryption. These zip tools provide additional options for users who need more than the basic functionality provided by Apple’s built-in options.