“`html
Effective Ways to Screenshot on Keyboard for Windows and Mac in 2025
Capturing your screen using keyboard shortcuts has become a crucial skill in both personal and professional settings. Whether you’re creating tutorials, sharing information, or saving important visuals, knowing how to screenshot efficiently is key. In this guide, we will explore various methods and techniques for taking screenshots using keyboard shortcuts on both Windows and Mac systems, emphasizing practical use and accessibility.
Understanding Screenshot Methods
There are numerous ways to take screenshots, but utilizing **keyboard shortcuts** is often the fastest and most convenient method. These shortcuts allow you to instantly capture important information and save it for your reference. Understanding these methods enhances your ability to use screen capture effectively, whether on a desktop PC or a laptop. Here are some of the most popular screenshot shortcuts you can employ to capture screens seamlessly.
Using the Print Screen Button on Windows
The **Print Screen** button, often abbreviated as PrtSc, is your gateway to instant screen captures on a Windows device. Pressing the PrtSc button will capture the entire screen and copy it to the clipboard. From there, you can paste (Ctrl+V) it into any image editing software or document. For a **quick screenshot**, you can also press Alt + PrtSc to capture only the active window. This method reduces the need for cropping or editing images later. To store your screenshot as a file directly, use Windows + PrtSc; this saves the screenshot directly to the **Screenshots** folder found in your **Pictures** library.
Utilizing Snipping Tool and Snip & Sketch
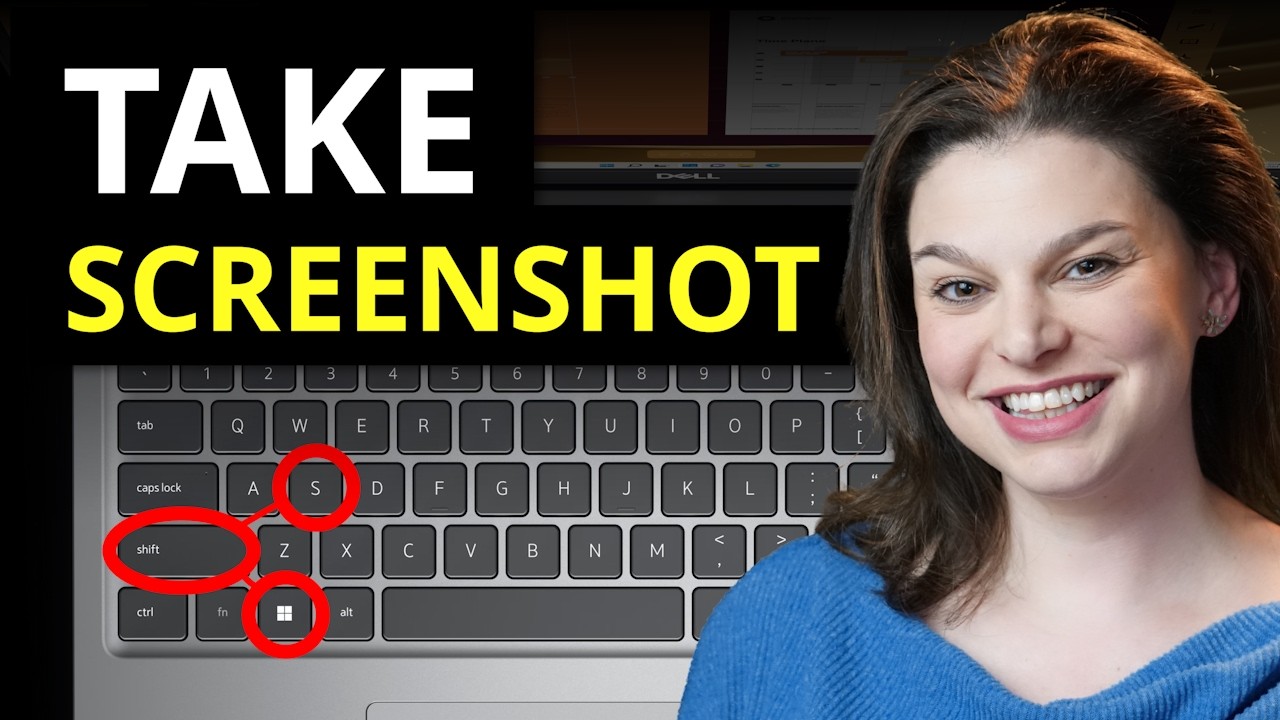
Windows comes equipped with screenshot applications like the **Snipping Tool** and **Snip & Sketch**, which facilitate more versatile screen capturing. The Snipping Tool allows you to capture selections of your screen, and you can access this tool by searching for it in the start menu. Snip & Sketch, an updated version, allows for immediate sharing and annotating of screenshots. To capture a screen using Snip & Sketch, press Windows + Shift + S; this will bring up a snipping toolbar, enabling you to select the part of the screen you wish to capture. Both tools can help improve the quality and utility of your **screenshot images** significantly.
Clever Techniques for Efficient Screen Capture
To enhance your screenshotting process, it may be beneficial to refine your technique based on the scenario. For instance, if you frequently need to capture web pages, consider using the **snipping tool guide** to take scrolling screenshots. With that option, one can capture an entire webpage seamlessly, instead of multiple images. Explore features such as **tagging screenshots** to improve organization, making it easier to find relevant captures later. By developing a consistent screenshot technique tailored to your workflow, you can significantly boost productivity and ensure you don’t miss out on essential information.
Taking Screenshots on Mac
Users of macOS have their unique set of shortcuts for capturing screens efficiently. The built-in screenshot functionalities on a Mac make it incredibly easy to take a screenshot, utilizing keyboard shortcuts that can adapt to various capturing preferences. Here’s a look at how you can master screenshotting on Mac.
Mac Screenshot Shortcuts Overview
On a Mac, you can utilize specific keyboard shortcuts tailored for screen capturing. To capture the entire screen, press Command (⌘) + Shift + 3; this immediately saves the screenshot to your desktop. To capture a selected portion of the screen, use Command (⌘) + Shift + 4, allowing you to drag around the area you wish to capture. This simple yet effective method allows for great precision in obtaining the exact information you require, reducing clutter from unnecessary areas. Additionally, if you want to capture a specific window, hit Command (⌘) + Shift + 4, then tap the Space bar; the pointer turns into a camera so you can click on the window of interest.
Exploring Screenshot Options on Mac
Understanding available screenshot options on Mac can empower users to capture screens effortlessly. Screenshots can be saved to the clipboard using the Control (⌃) key combined with the standard shortcuts, allowing users to paste the image elsewhere. Enabling the options from the screenshot menu (accessible by pressing Command (⌘) + Shift + 5) grants you the ability to adjust saving settings and even record your screen if needed. Moreover, macOS allows for easy editing right after taking the **screenshot**, enabling quick annotations before sharing.
Creative Ways to Use Screenshots
Screenshots can be utilized for various purposes beyond simple captures. Integrating them into presentations can enhance the visual impact, helping clarify complex information. In documentation, a well-placed screenshot can serve to illustrate steps or processes accurately. Using the built-in **editing tools** after capturing an image, users can crop, highlight, or add notes, making the information more engaging. Whether crafting visual tutorials, creating content for social media, or simply sharing fun moments, the potential use cases for screenshots are vast.
Best Practices for Taking Screenshots
To maximize the value and effectiveness of your screenshots, adhering to best practices can make a significant difference. Efficient screenshot techniques ensure you’re producing quality images that serve your specific purposes. Below are some tips to keep in mind when using keyboard shortcuts for capturing screens.
Know Your Screenshot Shortcuts
Familiarity with **screenshot options** across different platforms enhances your efficiency significantly. Regularly practicing the various shortcuts empowers you to react quickly, especially in situations requiring immediate capture. If you are using tools like Snagit or Greenshot, learn their personalized keyboard shortcuts for tailored workflow enhancements, suited to business or educational needs.
Edit and Annotate Screenshots Effectively
Utilizing image editing software or built-in tools post-capture can enhance your screenshots significantly. A well-edited screenshot can clarify complex ideas for viewers, while annotations provide context that text alone may not communicate. Make use of highlights, circles, and text boxes to direct attention to specific areas of importance in the captured screen.
Organize Your Screenshots
Establish a systematic approach for organizing your screenshots on both Windows and Mac. Sort captured images into appropriately named folders to enable straightforward access later. Tagging screenshots based on content greatly facilitates retrieval and can save time in the long run as you attempt to rediscover vital information from previous captures.
Key Takeaways
- Utilize keyboard shortcuts for quick and efficient screen capture.
- Familiarize yourself with the snipping tools available on each platform.
- Edit and annotate your screenshots to enhance presentation quality.
- Organize your captured images for easy retrieval.
- Consider exploring dedicated screenshot applications for advanced features.
FAQ
1. How do I take a screenshot on a laptop without the Print Screen button?
If your laptop does not have a dedicated **Print Screen button**, you can typically use alternative shortcuts. For Windows, use Windows + Fn + Space bar. On Macs, Command (⌘) + Shift + 4 allows you to capture any selected screen area directly.
2. What is the best screenshot software for high-quality images?
For achieving high-quality captures, software like Snagit and Greenshot are highly regarded. They offer additional editing features that standard tools may lack, allowing for enhanced customization with screenshots.
3. Can I screenshot a specific area of my screen using keyboard shortcuts?
Yes! On Windows, use Windows + Shift + S, which enables you to drag and select a particular area. On Mac, Command (⌘) + Shift + 4 lets you select precisely the desired area for capturing.
4. Are there options to record my screen instead of merely capturing it?
Yes, many tools provide screen recording capabilities, including the built-in options on both Windows and Mac. Use the keyboard shortcuts Command (⌘) + Shift + 5 on Mac or explore tools like OBS Studio for advanced recording features.
5. How can I improve the organization and management of my screenshots?
Implementing a clear folder organization strategy based on categories or projects can enhance your screenshot management. Utilizing tagging or labeling within your operating system can also assist in streamlining the retrieval process.
“`